Lecture 11 模型容器与 AlexNet 构建
上节课中,我们学习了如何搭建一个模型,搭建模型的过程中有两个要素:构建子模块和拼接子模块。另外,搭建模型时还有一个非常重要的概念:模型容器 (Containers)。本节课我们将学习模型容器以及 AlexNet 的构建。
1. 模型容器
在 PyTorch 模型容器中有三个常用模块:nn.Sequetial、nn.ModuleList 和 nn.ModuleDict。

nn.Sequential
nn.Sequential 是 nn.Module 的容器,用于 按顺序 包装一组网络层。

nn.Sequential 将一组网络层按顺序包装为一个整体,可以视为模型的一个子模块。在传统的机器学习中有一个步骤被称为特征工程:我们需要人为地设计特征,并将特征输入到分类器当中进行分类。在深度学习时代,特征工程这一概念已经被弱化,尤其是在卷积神经网络中,我们不需要人为设计图像特征,相反,我们可以让卷积神经网络去自动学习特征,并在最后加上几个全连接层用于输出分类结果。在早期的神经网络当中,用于分类的分类器是由全连接构成的,所以在深度学习时代,通常也习惯以全连接层为界限,将网络模型划分为特征提取模块和分类模块。对一个大的模型进行划分可以方便按照模块进行管理:例如在上面的 LeNet 模型中,我们可以将多个卷积层和池化层包装为一个特征提取器,并且将后面的几个全连接层包装为一个分类器,最后再将这两个模块包装为一个完整的 LeNet 神经网络。在 PyTorch 中,我们可以使用 nn.Sequential 完成这些包装过程。
代码示例:
1
2
3
4
5
6
7
8
9
10
11
12
13
14
15
16
17
18
19
20
21
22
23
24
25
26
27
28
29
30
31
32
33
34
35
36
37
38
39
40
41
42
43
44
45
46
47
48
49
50
51
52
53
54
55
56
57
58
59
60
61
62
63
class LeNetSequential(nn.Module):
    def __init__(self, classes):
        super(LeNetSequential, self).__init__()

        self.features = nn.Sequential(
            nn.Conv2d(3, 6, 5),
            nn.ReLU(),
            nn.MaxPool2d(kernel_size=2, stride=2),
            nn.Conv2d(6, 16, 5),
            nn.ReLU(),
            nn.MaxPool2d(kernel_size=2, stride=2),)

        self.classifier = nn.Sequential(
            nn.Linear(16*5*5, 120),
            nn.ReLU(),
            nn.Linear(120, 84),
            nn.ReLU(),
            nn.Linear(84, classes),)

    def forward(self, x):
        x = self.features(x)
        x = x.view(x.size()[0], -1)
        x = self.classifier(x)
        return x


class LeNetSequentialOrderDict(nn.Module):
    def __init__(self, classes):
        super(LeNetSequentialOrderDict, self).__init__()

        self.features = nn.Sequential(OrderedDict({
            'conv1': nn.Conv2d(3, 6, 5),
            'relu1': nn.ReLU(inplace=True),
            'pool1': nn.MaxPool2d(kernel_size=2, stride=2),

            'conv2': nn.Conv2d(6, 16, 5),
            'relu2': nn.ReLU(inplace=True),
            'pool2': nn.MaxPool2d(kernel_size=2, stride=2),
        }))

        self.classifier = nn.Sequential(OrderedDict({
            'fc1': nn.Linear(16*5*5, 120),
            'relu3': nn.ReLU(),

            'fc2': nn.Linear(120, 84),
            'relu4': nn.ReLU(inplace=True),

            'fc3': nn.Linear(84, classes),
        }))

    def forward(self, x):
        x = self.features(x)
        x = x.view(x.size()[0], -1)
        x = self.classifier(x)
        return x


net = LeNetSequential(classes=2)
net = LeNetSequentialOrderDict(classes=2)
fake_img = torch.randn((4, 3, 32, 32), dtype=torch.float32)
output = net(fake_img)
print(net)
print(output)
nn.Sequential 的两个特性:
- 顺序性:各网络层之间严格按照顺序构建。
- 自带
forward():自带的forward里,通过for循环依次执行前向传播运算。
nn.ModuleList
nn.ModuleList 是 nn.Module 的容器,用于包装一组网络层,以 迭代 方式调用网络层。
主要方法:
append():在ModuleList后面 添加 网络层。extend():拼接 两个ModuleList。insert():指定在ModuleList中位置 插入 网络层。
代码示例:
1
2
3
4
5
6
7
8
9
10
11
12
13
14
15
16
17
class ModuleList(nn.Module):
    def __init__(self):
        super(ModuleList, self).__init__()
        # 构建 20 个全连接层
        self.linears = nn.ModuleList([nn.Linear(10, 10) for i in range(20)])

    def forward(self, x):
        for i, linear in enumerate(self.linears):
            x = linear(x)
        return x


net = ModuleList()
print(net)
fake_data = torch.ones((10, 10))
output = net(fake_data)
print(output)
nn.ModuleDict
nn.ModuleDict 是 nn.Module 的容器,用于包装一组网络层,以 索引 方式调用网络层。
主要方法:
clear():清空ModuleDict。items():返回可迭代的键值对 (key - value pairs)。keys():返回字典的键 (key)。values():返回字典的值 (value)。pop():返回一对键值,并从字典中删除。
代码示例:
1
2
3
4
5
6
7
8
9
10
11
12
13
14
15
16
17
18
19
20
21
22
23
class ModuleDict(nn.Module):
    def __init__(self):
        super(ModuleDict, self).__init__()
        self.choices = nn.ModuleDict({
            'conv': nn.Conv2d(10, 10, 3),
            'pool': nn.MaxPool2d(3)
        })

        self.activations = nn.ModuleDict({
            'relu': nn.ReLU(),
            'prelu': nn.PReLU()
        })

    def forward(self, x, choice, act):
        x = self.choices[choice](x)
        x = self.activations[act](x)
        return x


net = ModuleDict()
fake_img = torch.randn((4, 10, 32, 32))
output = net(fake_img, 'conv', 'relu')
print(output)
容器总结
nn.Sequential:顺序性,各网络层之间严格按顺序执行,常用于 block 构建。nn.ModuleList:迭代性,常用于大量重复网络层构建,通过for循环实现重复构建。nn.ModuleDict:索引性,常用于可选择的网络层。
2. AlexNet 构建
AlexNet:2012 年以高出第二名 10 多个百分点的准确率获得 ImageNet 分类任务冠军,开创了卷积神经网络的新时代。
AlexNet 特点如下:
- 采用 ReLU:替换饱和激活函数 (例如:Sigmoid),减轻梯度消失。
- 采用 LRN (Local Response Normalization):对数据归一化,减轻梯度消失。
- Dropout:提高全连接层的鲁棒性,增加网络的泛化能力。
- Data Augmentation:TenCrop,色彩修改。
参考文献:ImageNet Classification with Deep Convolutional Neural Networks

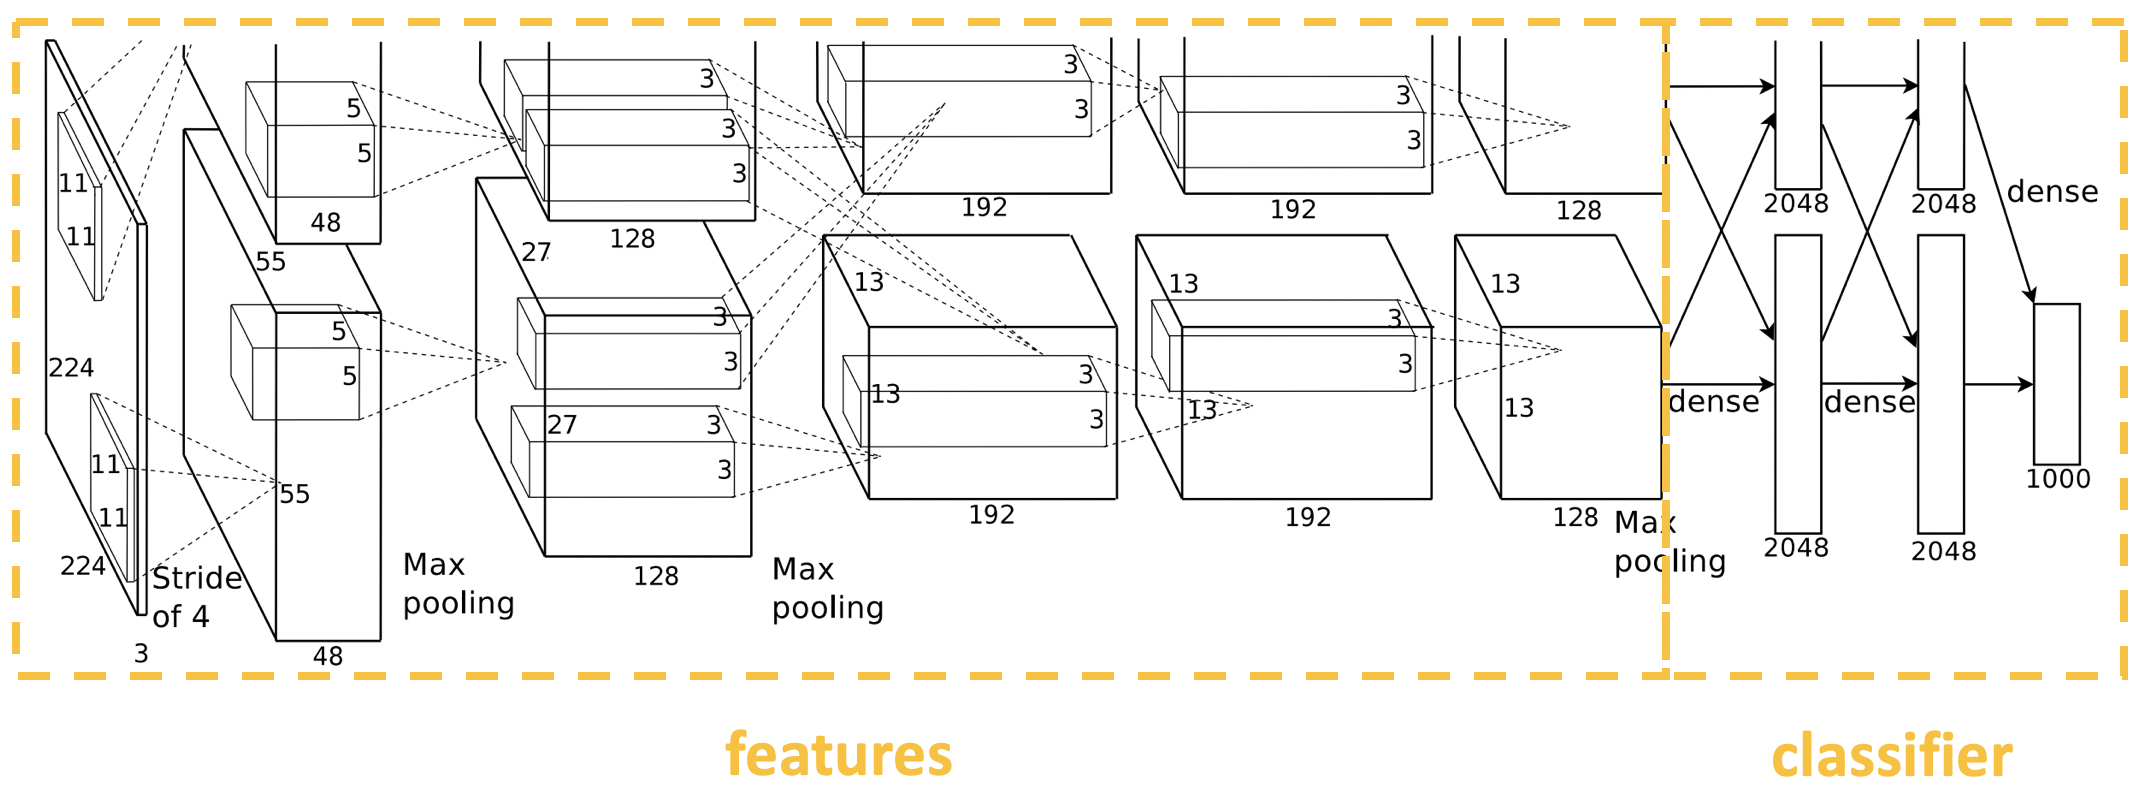
AlexNet 采用了卷积、池化、卷积、池化的堆叠方式来提取数据特征,后面再接上三个全连接层进行分类。这里,我们可以应用 nn.Sequential 中的概念,将前面的卷积池化部分包装成一个 features 模块,将后面的全连接部分包装成一个 classifier 模块,从而将一个复杂网络分解成一个特征提取模块和一个分类模块。
PyTorch 在 torchvision.models 中内置了 AlexNet 的实现:
1
2
3
4
5
6
7
8
9
10
11
12
13
14
15
16
17
18
19
20
21
22
23
24
25
26
27
28
29
30
31
32
33
34
35
36
class AlexNet(nn.Module):

    def __init__(self, num_classes=1000):
        super(AlexNet, self).__init__()
        self.features = nn.Sequential(
            nn.Conv2d(3, 64, kernel_size=11, stride=4, padding=2),
            nn.ReLU(inplace=True),
            nn.MaxPool2d(kernel_size=3, stride=2),
            nn.Conv2d(64, 192, kernel_size=5, padding=2),
            nn.ReLU(inplace=True),
            nn.MaxPool2d(kernel_size=3, stride=2),
            nn.Conv2d(192, 384, kernel_size=3, padding=1),
            nn.ReLU(inplace=True),
            nn.Conv2d(384, 256, kernel_size=3, padding=1),
            nn.ReLU(inplace=True),
            nn.Conv2d(256, 256, kernel_size=3, padding=1),
            nn.ReLU(inplace=True),
            nn.MaxPool2d(kernel_size=3, stride=2),
        )
        self.avgpool = nn.AdaptiveAvgPool2d((6, 6))
        self.classifier = nn.Sequential(
            nn.Dropout(),
            nn.Linear(256 * 6 * 6, 4096),
            nn.ReLU(inplace=True),
            nn.Dropout(),
            nn.Linear(4096, 4096),
            nn.ReLU(inplace=True),
            nn.Linear(4096, num_classes),
        )

    def forward(self, x):
        x = self.features(x)
        x = self.avgpool(x)
        x = torch.flatten(x, 1)
        x = self.classifier(x)
        return x
代码示例:
1
alexnet = torchvision.models.AlexNet()
3. 总结
本节课中,我们学习了 3 种不同的模型容器:Sequential、ModuleList、ModuleDict,以及 AlexNet 的搭建。下节课中,我们将学习 nn 中网络层的具体使用。
下节内容:nn 网络层:卷积层
本作品采用知识共享署名-非商业性使用-相同方式共享 4.0 国际许可协议进行许可。 欢迎转载,并请注明来自:YEY 的博客 同时保持文章内容的完整和以上声明信息!